

How To Use Template Builder In Quickbooks
Template Architect
SimulScan 1.1
Overview
Template Builder is a web-based tool for creating templates, which define the information captured by SimulScan and decide how it will exist processed and fabricated bachelor to applications. Templates are the key to controlling SimulScan data-capture features and for processing the acquired data.
This guide provides stride-by-step instructions for using the drag-and-drop interface of Template Builder to create Templates and deploy them to the devices. A familiarity with SimulScan concepts and terminology is required. If necessary, please lookout the short video below and review the SimulScan Glossary and About SimulScan pages earlier proceeding.
More than SimulScan videos
Before You Brainstorm
Before attempting to create a Template, the post-obit assets are required:
- Sample(due south) of the Document(s) (forms, labels, etc.) for which the Template(s) are being created
- Photos or image scans of those same documents (for upload)
- An account on the Template Architect web site
- A familiarity with Template concepts and SimulScan terminology
About Templates
Most acquisition tasks involve capturing data from printed documents. These "target" documents often vary in size, shape and layout, and present a challenge for authentic data conquering. Templates solve this problem by "instruction" SimulScan most the documents it will encounter, and defining how to scan and process data for each case of that target document.
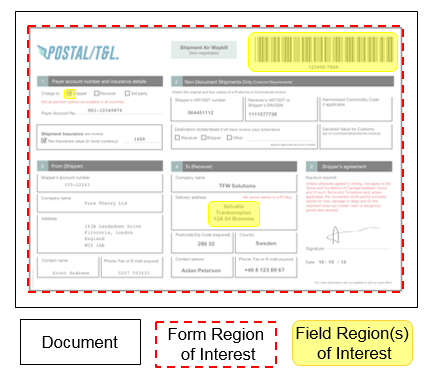
SimulScan Templates ascertain "Form Regions of interest" on Documents to exist scanned, "Field Regions of interest" inside forms, and the types of information (barcode, text, etc.) to be extracted from each Field. Templates are used in all SimulScan modes. They control its ability to decode and parse data, and determine how caused data tin be consumed by an application.
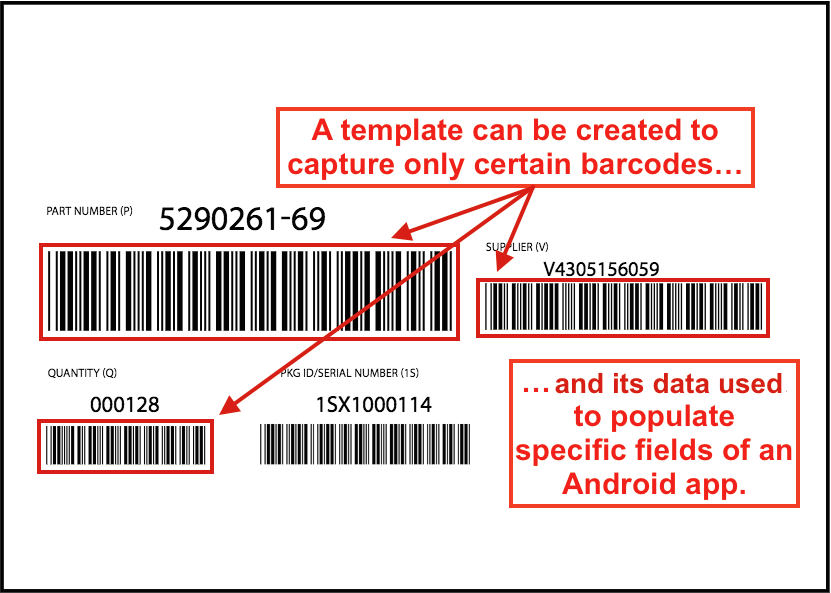 A typical barcode-only course, a common and constructive SimulScan usage scenario.
Structured vs. Unstructured
A Template can either be Structured or Unstructured, and generally would exist created to match a structured or unstructured Target.
A Structured Template is used when the Certificate to be scanned (aka "Target") has a fixed layout--one that doesn't change from ane instance of the form to some other. Structured Templates are used to acquire mixed types of information at once (barcodes, text, images, etc.), and are more often than not used for Document Capture. For example, a company that often encounters a stock-still-format grade such equally the Postal/T&L example (shown below) would create a Structured Template to place: 1) the location of each field to exist captured and ii) the type of data to exist processed from each identified field.
Structured Templates are used to:
- Scan barcodes, text and other data types from a unmarried form
- Invoke OCR to acquire alpha/numeric characters
- Invoke OMR to determine the condition of checkboxes
- Detect and capture signatures and other images
- Invoke MRZ to extract data from passports and other travel documents
- Extract information from other key fields of involvement
Unstructured Templates are predominantly used for capturing a single information type (for example, data from barcodes only). Unstructured Templates permit for target Documents that vary in layout and for target data that'due south located anywhere on the form. These are generally best for Multi-barcode utilize cases (as for the barcode-just grade above).
Unstructured Templates are used to:
- Capture only barcode information or just text
- Browse multiple barcodes/symbologies simultaneously
- or...
- Utilize OCR to capture a unmarried line of alpha/numeric text
- Use OCR to capture multiple lines of alpha/numeric text
For stride-by-footstep instructions on Template cosmos, meet Using Template Builder, below.
Structured Templates
Structured Templates work on the principle that the location and type of data in each field of a target course (i.east. barcodes, alphanumeric characters, signatures, etc.) will remain consistent whenever the class is used, and that only the data will change with each new case of the form. By creating a SimulScan Template to uniquely identify each region and data type, SimulScan learns what to look from each region of a form, which allows the developer to map the data from each region to specific fields of an application.
For example, if a course like the ane below was encountered regularly, a Structured Template using Mixed Data-blazon mode could exist created to acquire the barcode, numbers, text, checkboxes and signature in a single pass. For a demonstration using this form, meet the SimulScan Demo App.
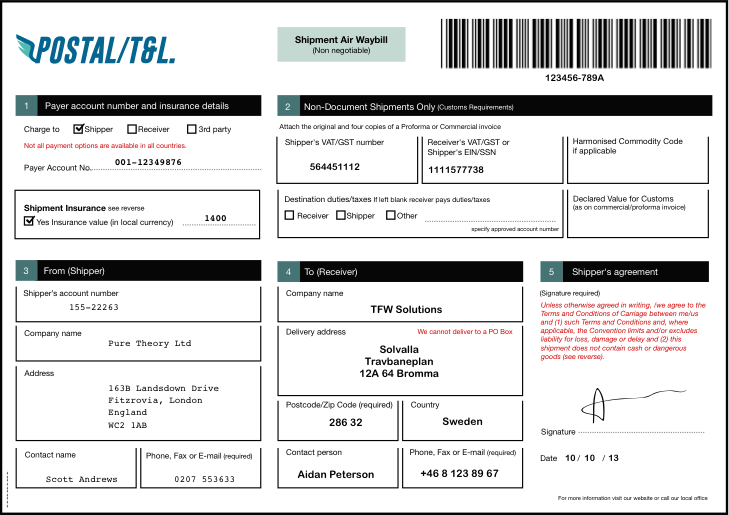 Example form for a Structured Template using Multi Data-type style.
Notes:
- Zebra recommends using the camera for Mixed Information-blazon capture.
- The camera is automatically selected when a Mixed Information-type Template is used.
- Structured Templates are generally associated with Mixed Data-type manner.
Unstructured Templates
Unstructured Templates are useful for Multi-barcoding utilize cases in which the target Document varies, or when acquiring a unmarried type of data--such every bit barcodes or text--from a form.
Companies could assistance meliorate scanning performance and workflow by creating an Unstructured Template that's configured only for the types of barcodes information technology receives on a regular basis. Multi-barcode mode can simultaneously handle a large number of 1D/2nd barcodes of the same or differing symbologies, but works most efficiently if the universe of potential symbologies is narrowed to only a few.
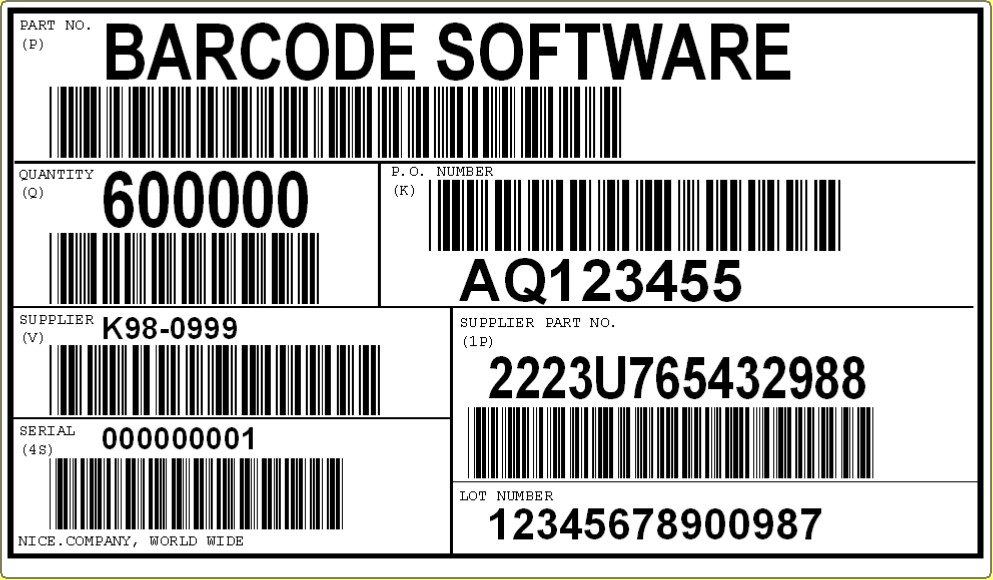 Case course for an Unstructured Template using Multi-barcode way.
Notes:
- Zebra recommends using the 2D imager for capturing in Multi-barcode mode.
- The device imager is automatically selected for Barcode-only Templates.
- The camera is automatically selected for OCR Templates.
- All Zebra devices that support SimulScan are equipped with 1D/second imagers (except early TC70 models).
For example, a company that receives regular shipments accompanied with a label like the one to a higher place could create a Multi-barcode Template to map the part number and supplier number from the barcodes in the upper row, and the quantity-received information from the lower row to the corresponding fields of an application.
Using Template Builder
Template Architect is free for Zebra partners and other registered users. Existing Zebra customers, partners and ISVs with admission to Partner Central can utilise their existing credentials to gain admission to Template Architect. Others must register using the instructions below. Credentials are generally sent within 1 or ii business days.
Annotation: SimulScan can exist used without a License simply to browse barcodes through an app using DataWedge. A SimulScan License is required for access to OCR and OMR features and/or SimulScan APIs. For more data, please come across the Licensing page.
Quick Steps
Below is a summary of the steps for creating a Template. The process is explained in detail in the section that follows.
- Log in to the Template Builder spider web site.
- Select the Template type required.
- Upload an image of the Target Document to be scanned (bmp, jpg, png or PDF; 5MB max.).
- Identify regions of the Document and the data types (barcodes, text, etc.) of each.
- Save and download the completed Template(s) to the development host (local PC).
- Re-create Template(southward) to the device that volition be performing the scans.
- Activate the Template from within DataWedge or other scanning app.
1. Create an Account, Log In
-
Visit the Zebra SimulScan registration page, follow prompts to create a free account and enter all requested information. Once an business relationship is created, Zebra administrators volition ship login data to the registered accost. **Zebra recommends planning ahead; this process could take several days.
-
Point a browser to simulscan.zebra.com and enter the login credentials. A screen appears similar to the epitome below:
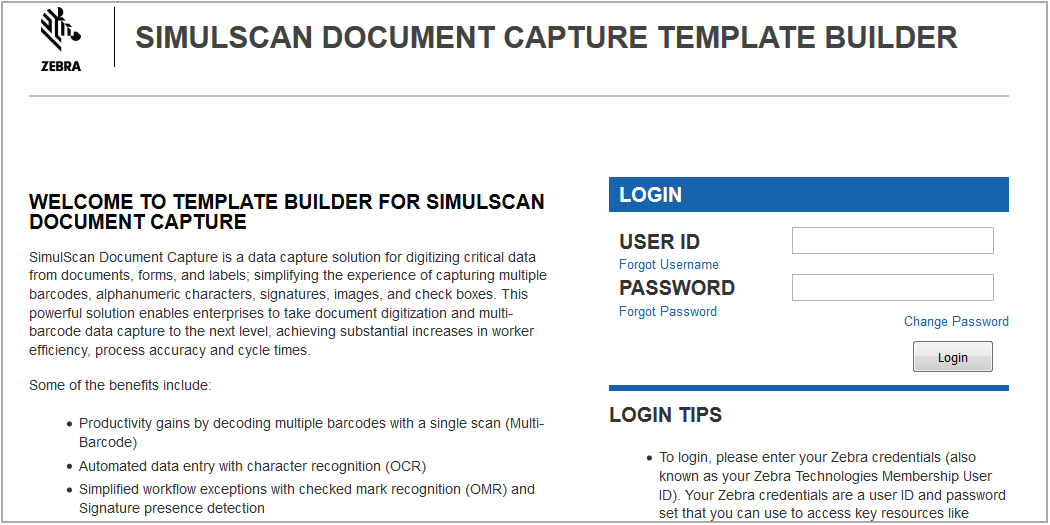 The Template Builder login screen at simulscan.zebra.com
two. Select Target Type
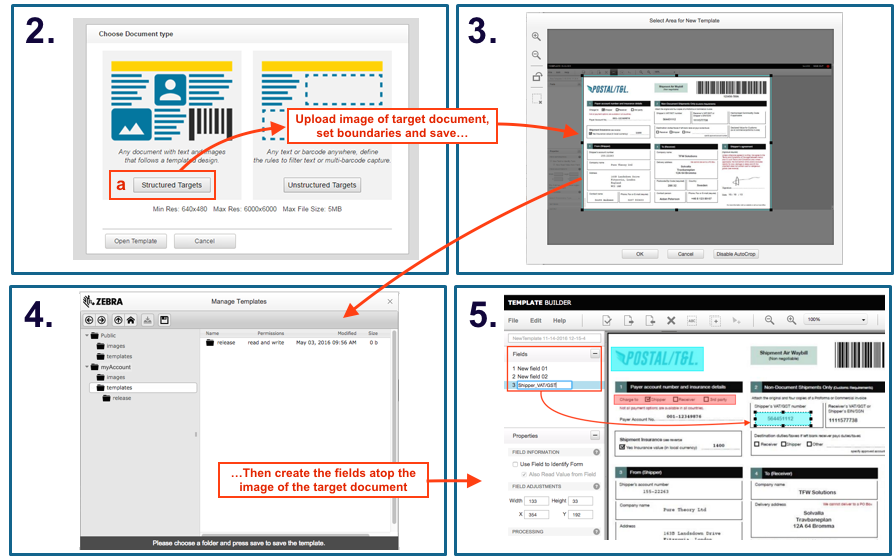
2a. Select "Structured Targets" for layouts that do non change from one case to another (run into image 2, below).
Then:
- An Open up... dialog appears
- Select and upload an image of the Target Document for which to create the Template, observing the following parameters:
- Supported file types: bmp, jpg, png or PDF
- Min. res: 640x480
- Max. res: 6000x6000
- Max. file size: 5MB
- For a PDF, select page number from the drop-down (if necessary)
- Confirm that the "AutoCrop" feature (enabled by default) has accurately identified the Document boundaries (image 3).
- If boundary adjustments are necessary, click "Disable AutoCrop" and gear up the Blue bounding box so that it's but outside the borders of the Document. Click "OK" when done. This creates the "Form Region of Involvement" for the Document.
- Click OK and Save the Template to proceed (image iv). Note: The Template name prefix "Default -" is reserved for system utilize. All other alpha/numeric combinations are accepted.
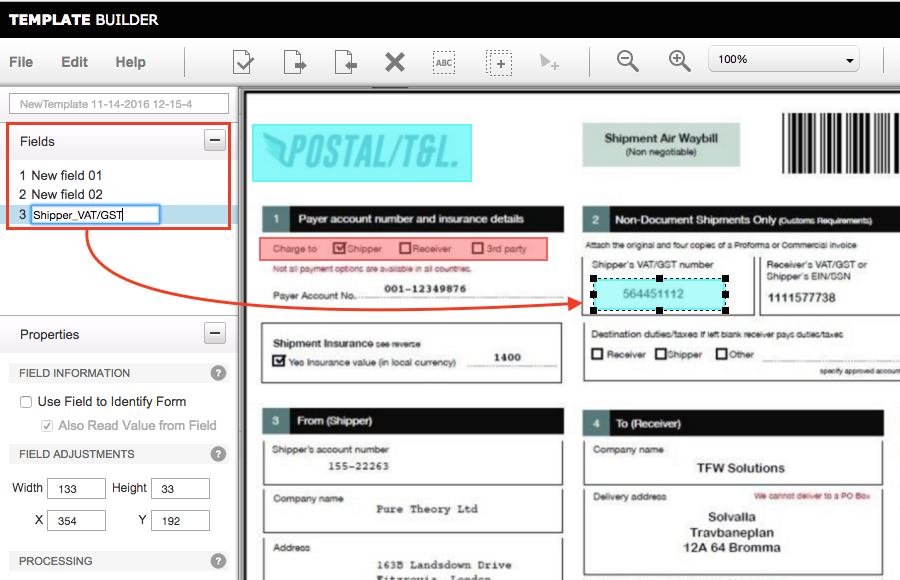
- Afterward saving the new Template, the uploaded prototype appears (epitome five). Drag a box from the upper-left corner to the lower-right corner over each Region of the Document that contains information to be acquired. This creates the Field Regions of Interest.
- When finished, configure Field settings as required.
 Click image to enlarge
Field Creation Guidelines:
- Barcode Regions must include only the bars and spaces ; no surrounding characters should be included.
- OCR Regions should include surrounding white space equal to about 2 characters in width and pinnacle.
- OMR Regions should exist kept tight to Bounding Boxes. A split up OCR Region can be created to capture the name or description of the region, if needed.
Alternative ways to create Fields:
- Select Edit --> Create New Field, enter a name for the field and draw a box around the respective Region.
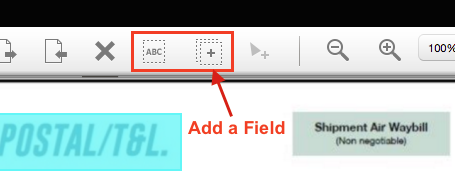
- Click the Add Field push (arrow, beneath), enter a name and draw a box effectually the corresponding Region.
2b. Select Unstructured Targets for layouts that might alter from ane example to another or to learn a unmarried type of data.
Then:
- Select "Multi-barcode" to capture barcodes or "OCR" for blastoff/numeric text:
- If selecting Multi-barcode, upload an epitome of the target Certificate to define the Fields and aid SimulScan identify the grade (epitome 4, below).
- If selecting OCR, Template Architect generates a static image automatically (paradigm 5, below).
- Configure settings as described below.
 Click image to enlarge
3. Configure Settings
Provide (or confirm) the following required settings for each Field created:
- A name for the field, if desired
- Backdrop (length/width and 10-Y coordinates)
- The required Processing mode (barcode, OCR, etc.)
- Specific processing-way settings (decoder blazon, text blazon, etc.)
- Select at least two "Ballast Elements" (explained in Stride 4)
Relieve work oft! Unsaved changes could be lost if the screen is dismissed or a session timeout is reached.
 Click image to enlarge
Field Properties Console
In the image above, the Field Properties console is visible in the far-left column, and presents the Properties of the selected Field. Field Properties tin be configured as follows:
Field Information
Use Field to Identify Form - designates the field as an Ballast Element, which SimulScan uses to identify a grade, match it with Template and configure its Field backdrop accordingly. By default, the data in this field is not output for Templates made for Structured Targets.
As well Read Value from Field - sets the Template to acquire data from a Field that is designated equally an Anchor Element (the "Use Field to Identify Form" is checked). Enabled past default.
Field Adjustments
Width - the width of the field, in pixels Height - the height of the field, in pixels 10 - the horizontal position of the field, in pixels, relative to the left-nearly edge of the form Y - the vertical position of the field, in pixels, relative to the height of the grade
Processing
Barcode - captures single or multiple barcodes in the field of view
OCR - captures alpha/numeric text
OMR - captures check marks and bubbles
Picture - captures signatures, photos or entire Documents as an prototype file. Minimum capturable epitome size is 128 x 128 pixels; maximum is 2600 x 2000 pixels.
Signature Presence - determines whether a signature is present in the selected region, displays an error to the user if none is institute. Applies to Film fields that utilise the OMR feature to detect a marked area.
Barcode'due south location is stock-still - specifies that a barcode will always be in the same location on the Document being defined by the electric current Template. Applies when the field processing mode is "Barcode" and the Barcode Type is fix to a supported symbology (meet tabular array, beneath). Symbologies shown in gray are not recommended. To better the accuracy of form identification, Zebra recommends enabling this characteristic whenever possible.
Fixed Barcode Supported Symbologies
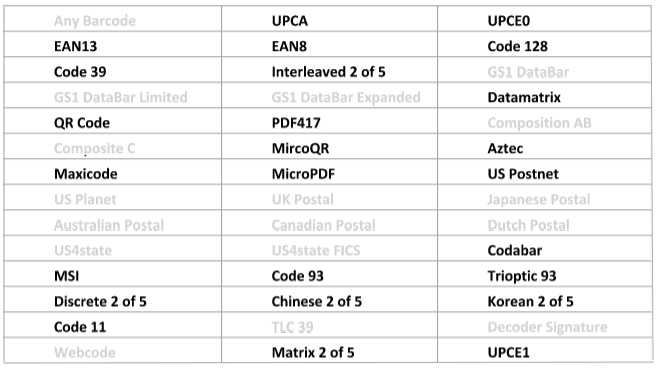 Grayed symbologies are Not recommended for selection every bit fixed barcodes.
Barcode Options
Some barcode options vary based on the symbology selected. For a complete listing of options, come across the DataWedge Decoders guide.
Decode Information Options
Enable Character Checking - enables the barcode information to aid in the identification or verification of the barcode information being decoded. When selected, the following options become available:
- Starts With... checks for the specified character(s) starting with the first character (index 0) of the acquired barcode information.
- Contains - checks for the specified grapheme(southward) in the acquired data starting at the index specified in the "at" field (index 0 = the first grapheme).
- Cord Length - the number of characters the barcode data must contain. Exit blank to leave length unspecified.
Barcode Orientation -sets the orientation of the barcode relative to the scanner:
- 0° - the barcode is right-side up on the form.
- 90° - the barcode is rotated 90 degrees to the left (counterclockwise).
- 180° - the barcode is upside down.
- 270° - the barcode is rotated 270 degrees to the left (counterclockwise).
Orientation must be consistent beyond the entire Certificate.
Unlike or additional Field Property settings announced under certain conditions .
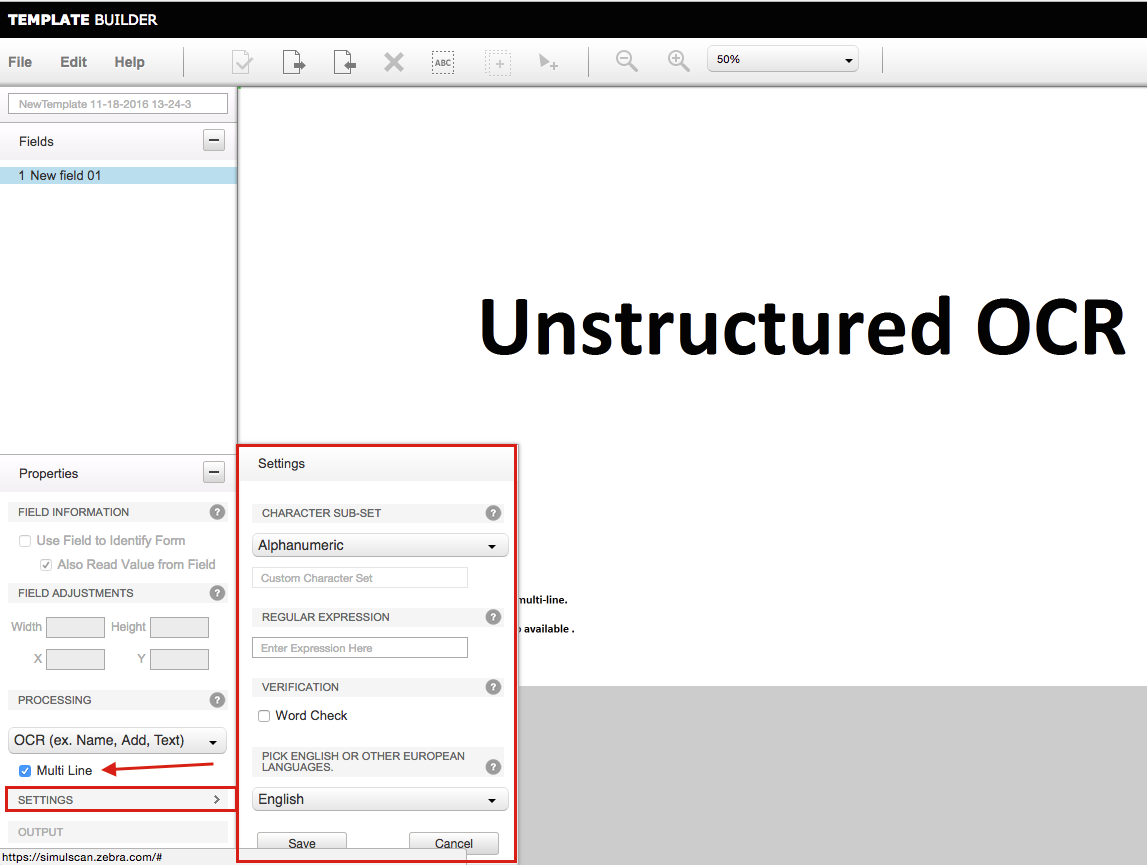
OCR Settings
To maximize the accuracy of character recognition in OCR regions, it's important to configure OCR parameters according to the expected input. Note: OCR capture requires the device viewfinder to be positioned directly over the text to exist captured.
 Click prototype to overstate
Graphic symbol subsets - identifies the blazon of text that will be acquired:
- All caps alphabets - text will comprise all uppercase letters
- All small alphabets - text volition contain all lowercase letters
- But Alphabets - text contain only blastoff characters (upper- and lowercase)
- All digits - text contain but numbers
- Alphanumeric (default) - text contain a combination of letters and numbers
- Enter custom sub cord set here - enter information about custom characters in the Custom Character Ready text box
Regular Expressions - data will consistently exist presented in a particular pattern (i.eastward. MM/DD/YYYY). Specify as a Regular Expression according to the table below:
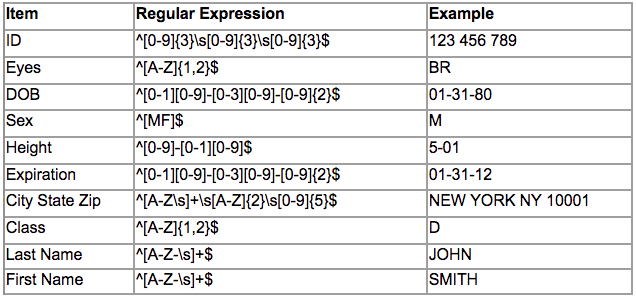
Zebra recommends using this choice simply if the format defined can be guaranteed for the region.
SimulScan references the Perl Compatible Regular Expressions (PCRE) library for regular-expression design matching. Setting the character subset is easy but fibroid; setting the regular expression is complex but precise. Specifying both the subset and the regex greatly narrows the range of possible candidates. Learn more by reading the Perl RegEx Human being Pages.
Word Cheque - enables a spell-check in the selected language. Use on regions known to contain just words.
Language - English language is the default. Switching to European will recognize characters typically found in European languages such as the digraph, circumflex and umlaut.
OMR Settings
The data type for optical marker recognition (OMR) is binary, resulting in the conquering of a yep/no status (i.eastward. "mark is present" or "marking is not present"). A tertiary "undecided" land results when SimulScan is unable to recognize a mark. Use OCR to acquire the label that describes the marker, if desired.
Configure the Bounding Shape to ensure the most accurate result:
Bounding Box Shape - the shape of the object on the printed class that contains the marking to be acquired.
- Circle - mark is within of a circular boundary
- Oval - marking is inside of an oval-shaped boundary
- Square - marker is inside of a square boundary
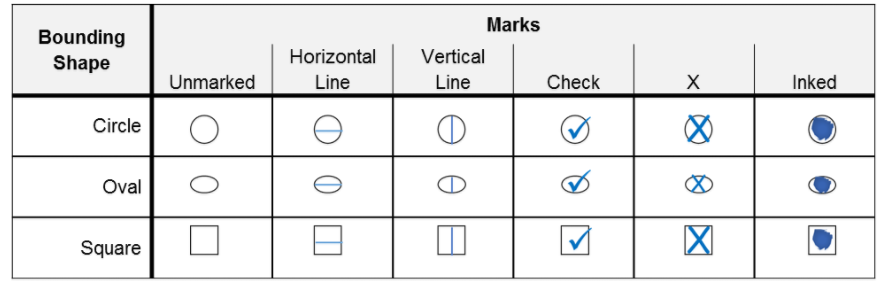 Acceptable marks for optical marking recognition; OMR also is used to find signature presence.
Template Settings
The Template Settings panel is used to configure settings such as input source, flash fashion, user feedback and other settings that apply generally across the Template.
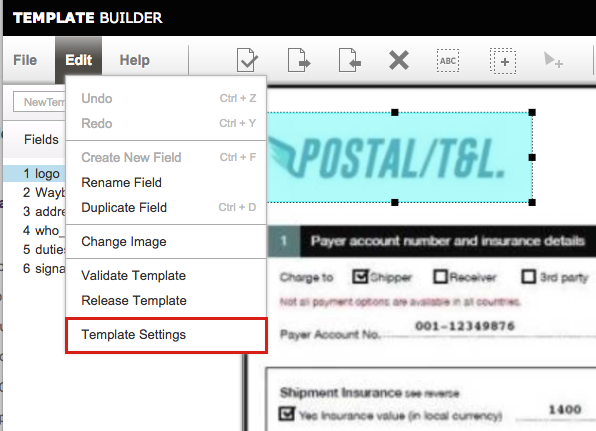
To access the Template Settings panel:
- Log into the Template Architect web site.
- Open up the Template in need of settings aligning.
- Select Edit --> Template Settings. A dialog appears like to the image below.
 Click paradigm to enlarge
- Adjust settings equally needed according to descriptions that follow the paradigm beneath:
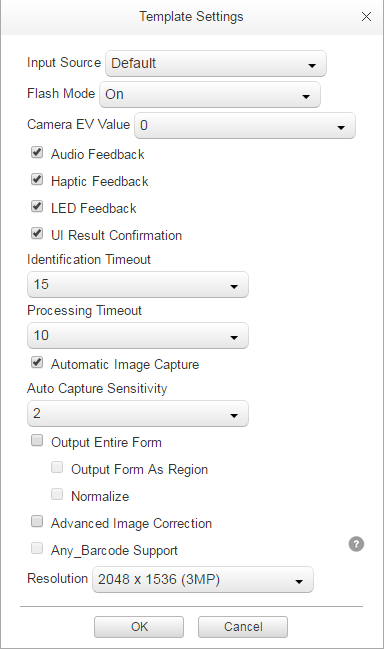
Template Settings Panel
Input Source – used to specify the input source (Camera or Imager) to utilize for the Template. Selecting "Default" allows the organization to choose the input source as follows:
- Selects Camera for Structured and Unstructured targets
- Selects Imager for Barcode-merely targets
- If no Imager is present, the photographic camera is selected for all targets
- If photographic camera is disabled, Imager is selected for all targets
- If no capture device is available, an error message is displayed
Flash Fashion – enables/disables use of the wink during capture.
Audio Feedback – plays a sound when information is acquired (enabled by default).
Haptic Feedback – operated the vibrator when data is acquired (enabled by default).
LED Feedback – lashes the LED when information is acquired (enabled by default).
UI Result Confirmation - forces a user confirmation before sending acquired data to app (disabled past default for Barcode-only targets; enabled past default for Structured and Unstructured targets).
Identification Timeout – sets the maximum time immune to attempt to identify a target Document.
Processing Timeout – sets the maximum fourth dimension allowed to procedure a target Document afterward it has been identified.
Automatic Image Capture – automatically triggers form processing, in one case identified. Uncheck to force the user to manually trigger form processing (once identified) by borer or pressing the trigger button.
Motorcar Capture Sensitivity – sets the sensitivity of the auto capture from 1-10 (most sensitive). Valid only when Automatic Image Capture is enabled.
Output Entire Form – outputs an image of the unabridged form along with the extracted data. Valid only for Structured Targets. Enabling this characteristic affects scanning operation.
Advanced Prototype Correction – enables image correction for parsing targets that are slightly curved or crumpled.
4. Select Anchor Elements
In addition to its use of Document border dimensions, SimulScan can employ Fields, company logos and other unique attributes of a Document to positively identify information technology and determine its orientation relative to the scanner (i.e. whether it'southward upside downward). These so-chosen Anchor Elements also can contain data to be acquired, such equally a barcode or prototype, though it is not required. Zebra recommends that at least two Anchor Elements be identified in accordance with the guidelines below.
Selection Guidelines:
- Select ii or three Fields per document as Anchor Elements.
- Anchor Elements should be spread beyond the superlative, lesser and side(due south) of the Certificate.
- Draw Fields loosely around graphics and tightly effectually barcodes; white space helps with identification of graphics only can cause errors for barcodes.
- For Structured Targets, static fields such as logos and preprinted content work well.
- Anchor Elements need not comprise information to exist acquired; the "Too Read Value from Field" parameter is optional.
- For Anchor barcodes:
- Draw Fields tightly around barcodes; get out no gaps exterior the bounding box.
- Barcodes with a fixed location and size on all instances of a form work all-time.
- Select the "Barcode's location is fixed" option in the Properties panel.
- Select symbologies with uniform numbers of digits to ensure consequent region size.
- Avoid symbologies with multiple level/stack/region barcode combinations (which may vary in region size).
- Zebra recommends using only the post-obit barcodes for fixed-manner: Grayed symbologies are Not recommended for selection as fixed barcodes.
In the Postal T&Fifty Document beneath, the logo in the upper-left corner and the barcode in the upper-correct would identify this form adequately for SimulScan to activate its template. Notice that the graphic is loosely bounded and the barcode tightly. 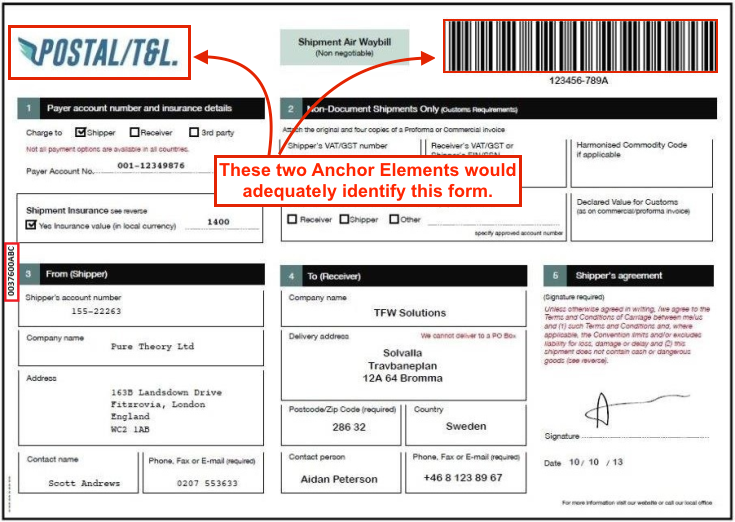 Draw Fields tightly around barcodes and loosely effectually graphics for best results.
When using a fixed barcode as an Anchor Element, exist sure to select "Barcode'due south location is fixed" in the Properties panel, as below: 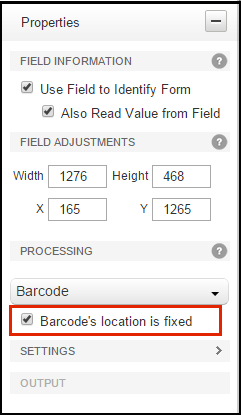 This attribute appears only in Templates for Structured Targets that use a not-postal symbology.
5. Examination and Validate Template
Zebra recommends testing all Templates before deployment to devices to ensure proper operation. This tin be done using the SimulScan Demo App. Template Architect also provides a Validation feature, which verifies template Fields and returns useful information about Field properties and settings. Both are explained below.
To examination a Template using the Demo App:
After pushing the Template to a device...
8. Open the SimulScan Demo App, tap on the "Hamburger" menu, and select Menu -> Setup Custom Demo options, and navigate to the Template to be tested.
Verify that the Template works as expected.
To Validate Template:
9. Open the Template to be validated and select Edit...Validate Template.
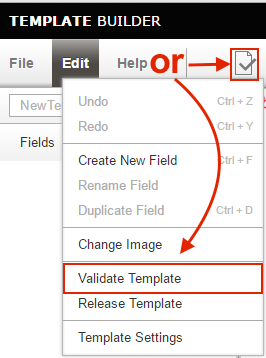
A Validation Summary is displayed with 1 of more than of the following messages:
Grade Decoded:
- The Template successfully identified the target Document.
- At to the lowest degree ii fields take been designated as Anchor Elements.
- Barcode Field(s) designated every bit "Utilise field to identify the form" utilize a supported symbology and its length is within the supported range.
- The uploaded image of the target Document is clear and its resolution is correct.
Key field(south) identified in template:
- Required aspect(s) (i.east. name, number, ten/y, width, height) found for each marked region.
Field setup and data parsing
- Fields cover the valid vicinity of all information of involvement.
Final result:
- (√) = "Success!"
- (X) = "Mistake!"
Validation Preview
Following validation, test results can exist reviewed by clicking on "View Preview" button as in the image beneath.

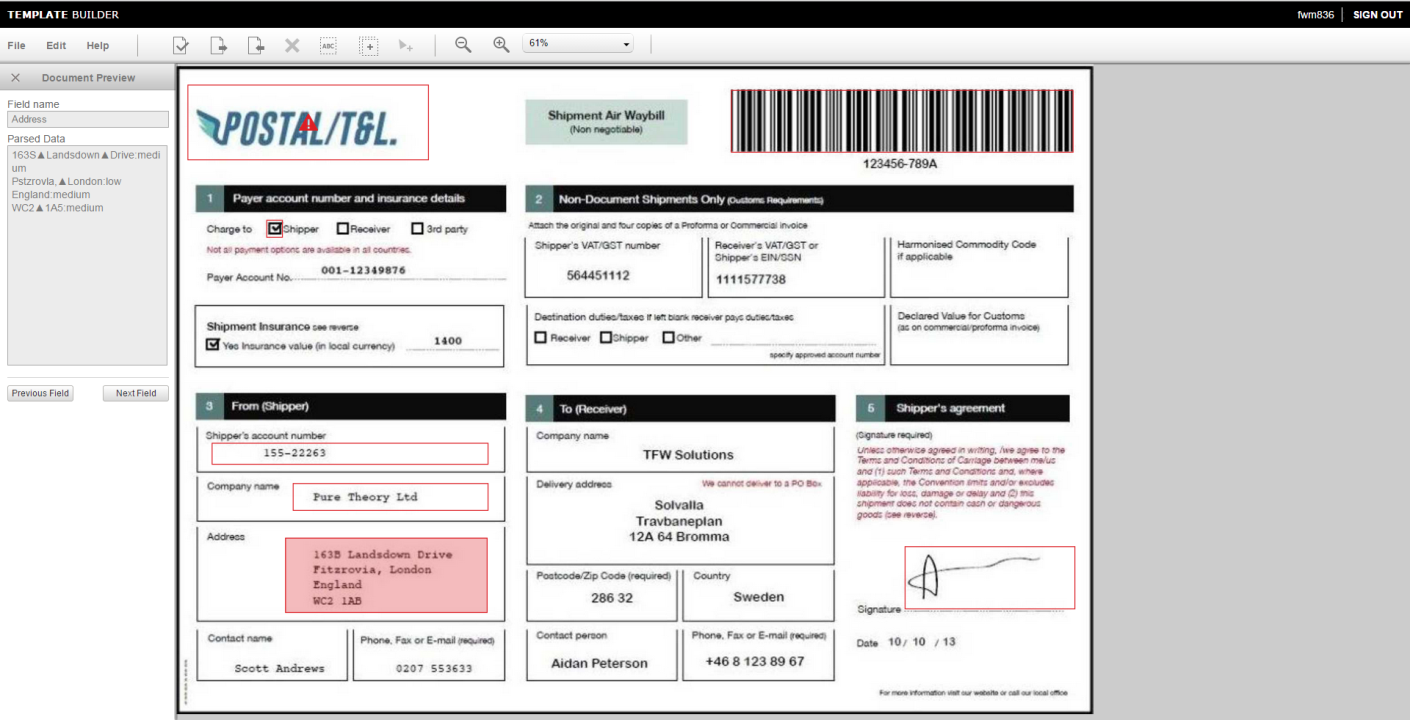
The image below shows a validation preview. Clicking on any Field in the prototype surface area displays in the left-mitt cavalcade the data that is parsed by that Field. In addition to decoded output, OCR data too shows the accuracy level (loftier, medium or depression) for each line of the region parsed. Regions designated equally OMR signal their status (Checked, UnChecked or Undecided).
 Click image to enlarge
6. Deploy Templates
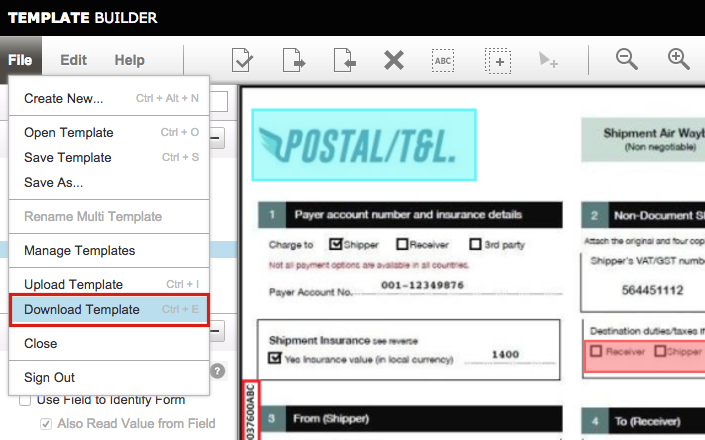
After settings are configured and validated, select File -> Download Template to download a copy to the local development host:
Once downloaded, the Template can exist deployed to scanning devices.
Warning: Do not endeavour to alter the Template file by hand. Templates comprise machine-generated XML stored in Base64-encoded files, and are not intended to be edited manually.
How and Where to Place Files
If using SimulScan through DataWedge, Template file(s) must be in the directory shown below.
For DataWedge:
-
/enterprise/device/settings/datawedge/templates/
For the SimulScan Demo App:
-
/sdcard/simulscan/templates/
For a custom app:
- Whatever device folder attainable past the app, or...
- In
/templates/release/on the Template Builder server (seeFetchTemplate(), below)
Note: All files in /enterprise/ on the device will persist following an Enterprise Reset.
Methods of Template deployment:
- Manually via USB cable to the device using the Android Debug Span (ADB)
- Remotely using StageNow and the UI Director service
- Remotely through a visitor's ain mobile device management (MDM) arrangement (if supported past that system)
- Programmatically through EMDK for Android development tools
Using the FetchTemplate() method call
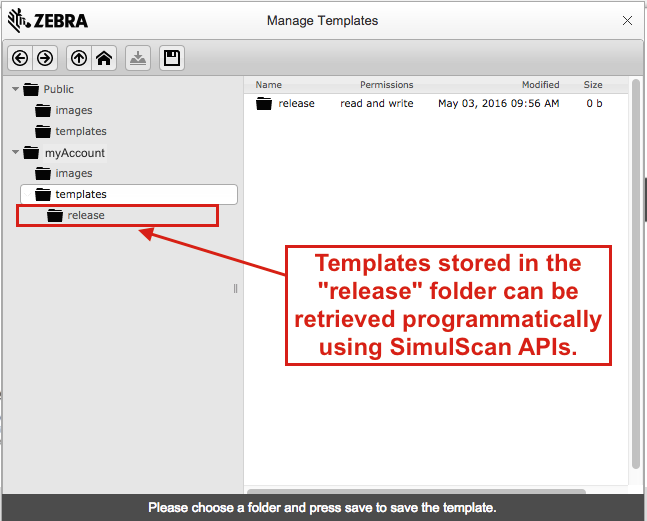
Templates saved to the /<accountID>/templates/release/ folder on the Template Builder server can be retrieved programmatically through EMDK APIs using the FetchTemplate() method. Apply Template Builder to identify the exact path name when calling the method.
For example, the path to the server-based Templates folder from the epitome below would exist:
-
/myAccount/templates/release/<template name>
To add a Template to the /release binder:
- Open the Template
- Select Edit --> Release Template
A copy of the Template is placed in the /release folder; the Template likewise remains in its original location. When the method is called, the specified Template is copied to the device.
Modify a Template
Existing Templates can be modified to address changes that occur to incoming Documents, to allow for workflow changes, to make adjustments to OCR or other settings based on input from the field, or for any other reason.
Warning: Practice not effort to change the Template file by manus. Templates contain machine-generated XML stored in Base64-encoded files, and are not intended to be edited manually.
To alter an existing Template:
- Log into the Template Builder web site.
- Click the Open up Template push or select File -> Open Template to Open the template to be modified.
- Edit Template settings equally required.
- Save using File --> Save Template or File --> Salvage as... to create a new version.
- Examination, Validate and Deploy every bit explained to a higher place.
Create a Multi-Template
The optional Multi-template feature allows every bit many as half-dozen (half dozen) existing Templates to be grouped together and deployed to devices every bit a single entity. This simplifies deployment and tin help heave worker productivity on devices that regularly use two or more than Templates by automating Template selection. For example, if workers in a warehouse regularly encounter browse Documents from three specific suppliers, group the corresponding three Templates together quickens the selection of the appropriate Template whenever scanning is required.
To Create a Multi-template:
After creating the Templates needed for grouping...
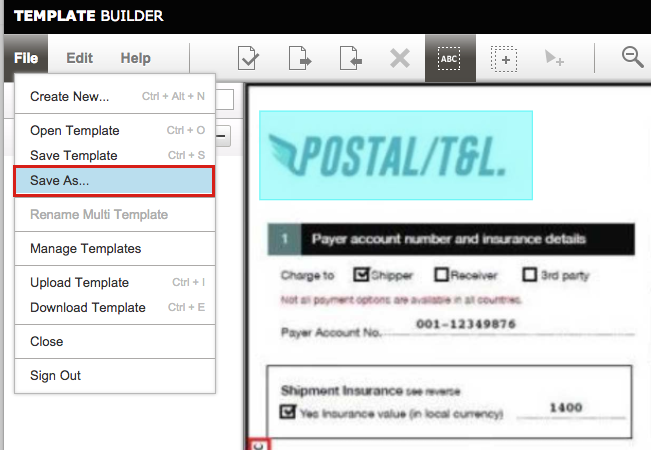
1. Select File --> Create New...Multi Template: 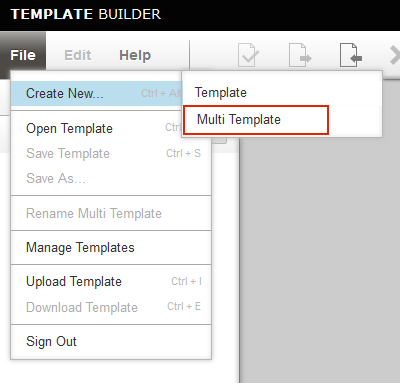
2. Enter a name for the Multi-template: 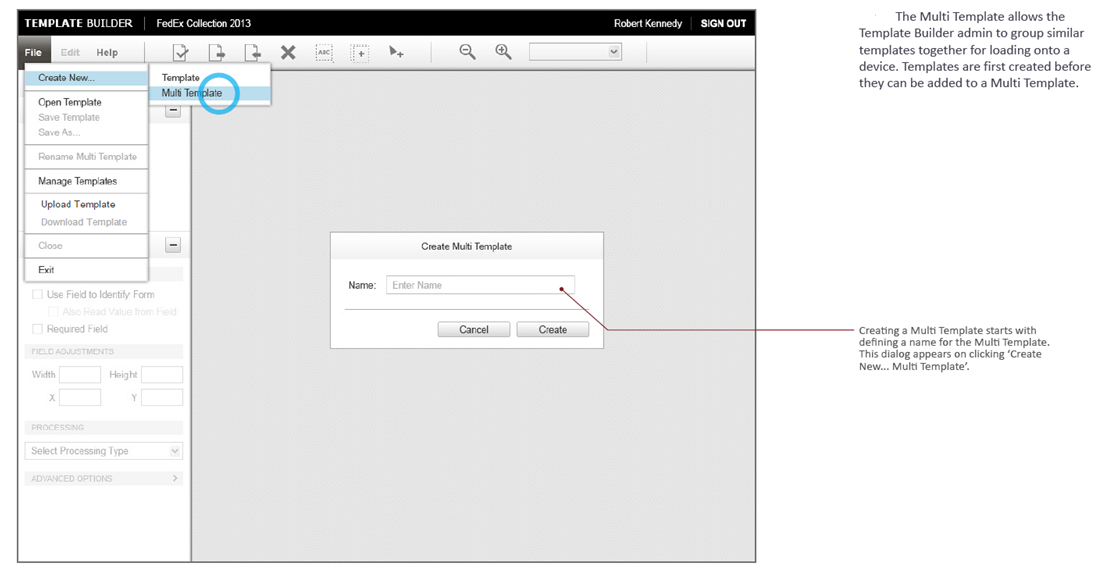
3. Click "+ Add Template" button. A dialog appears like to the image in Step 4. 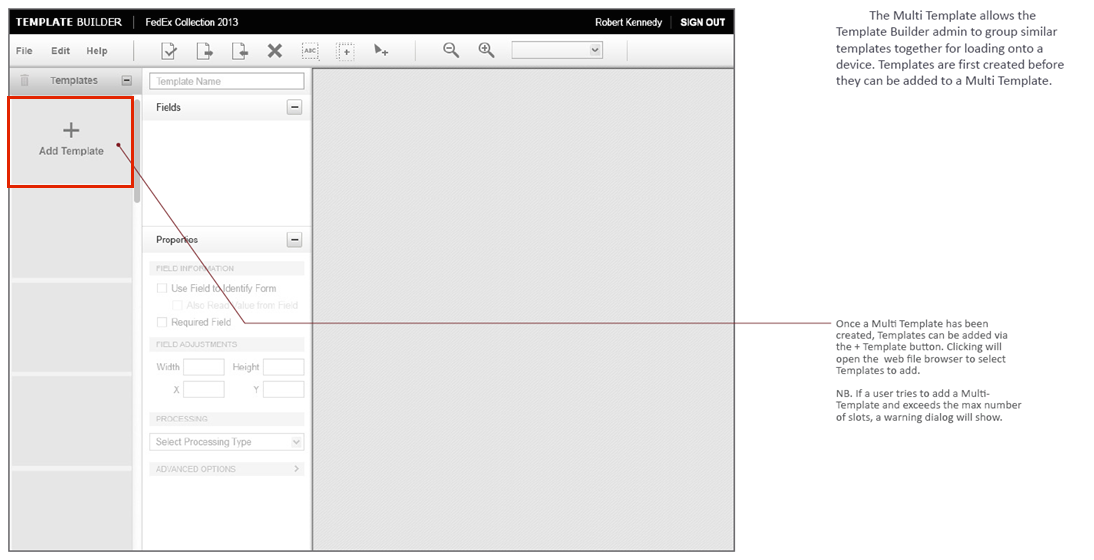
iv. Select the location of the Template to be added: 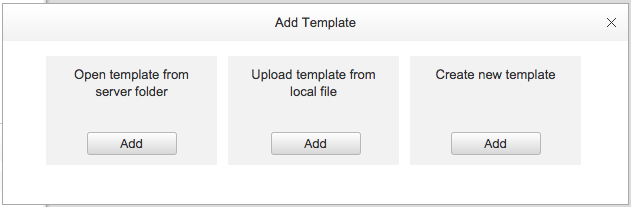 If a new Template is required, click the "Create new template" push.
As Templates are added, thumbnails volition appear in the far-left column and field names of the selected Template in the center column. Actions taken in this mode will utilize to the selected Template. 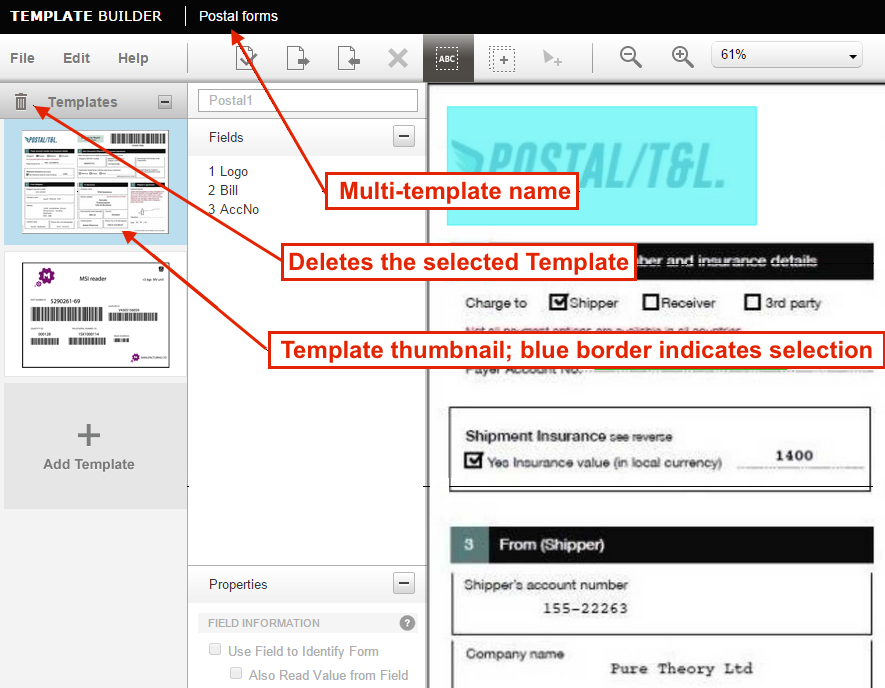
5. Repeat Footstep 4 until all required templates are added (max = 6).
6. To deploy Multi-template(s), see Deploy Templates department, higher up.
Related Guides:
- DataWedge
- SimulScan APIs
- Enterprise Browser

How To Use Template Builder In Quickbooks,
Source: https://techdocs.zebra.com/simulscan/1-1/guide/templatebuilder/
Posted by: edwardswiging.blogspot.com
0 Response to "How To Use Template Builder In Quickbooks"
Post a Comment