

How To Draw A Simple Ship
Update note: Tom Elliott updated this tutorial for iOS 12, Xcode 10 and Swift iv.2. Ray Wenderlich wrote the original.
This is the first in a series of Core Graphics tutorials that will to take the mystery out of Cadre Graphics. You lot'll learn the APIs step past pace with applied exercises, starting by beautifying table views with Core Graphics.
Core Graphics is a really absurd API on iOS. Every bit a developer, y'all can apply it to customize your UI with some really bully effects, often without fifty-fifty having to get an artist involved. Annihilation related to 2nd drawing — like drawing shapes, filling them in and giving them gradients — is a good candidate for using Cadre Graphics.
With a history that dates dorsum to the very early days of Os X, Core Graphics is 1 of the oldest APIs all the same in use today. Perhaps this is why, for many iOS developers, Core Graphics tin exist somewhat intimidating at beginning: Information technology'southward a large API and has enough of snags to get caught on along the way. Even so, since Swift three, the C-style APIs have been updated to look and feel like the modernistic Swift APIs yous know and dear!
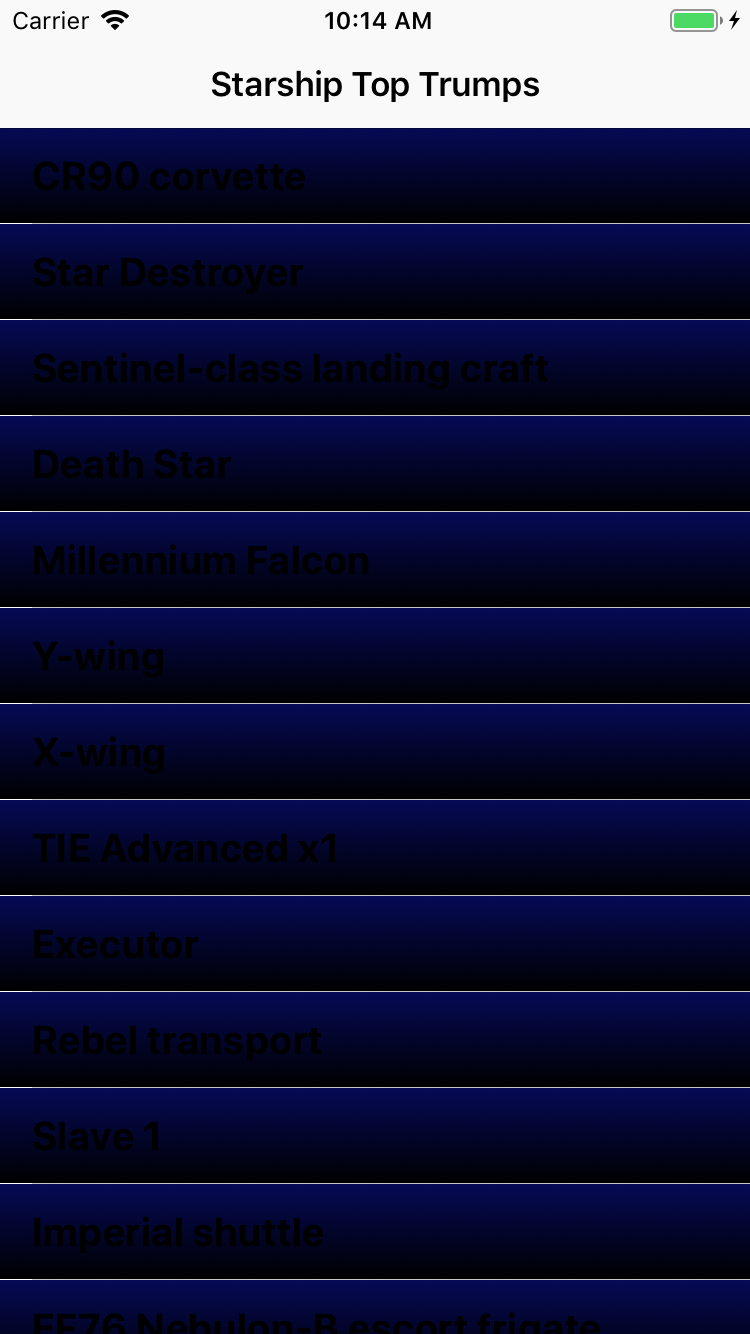
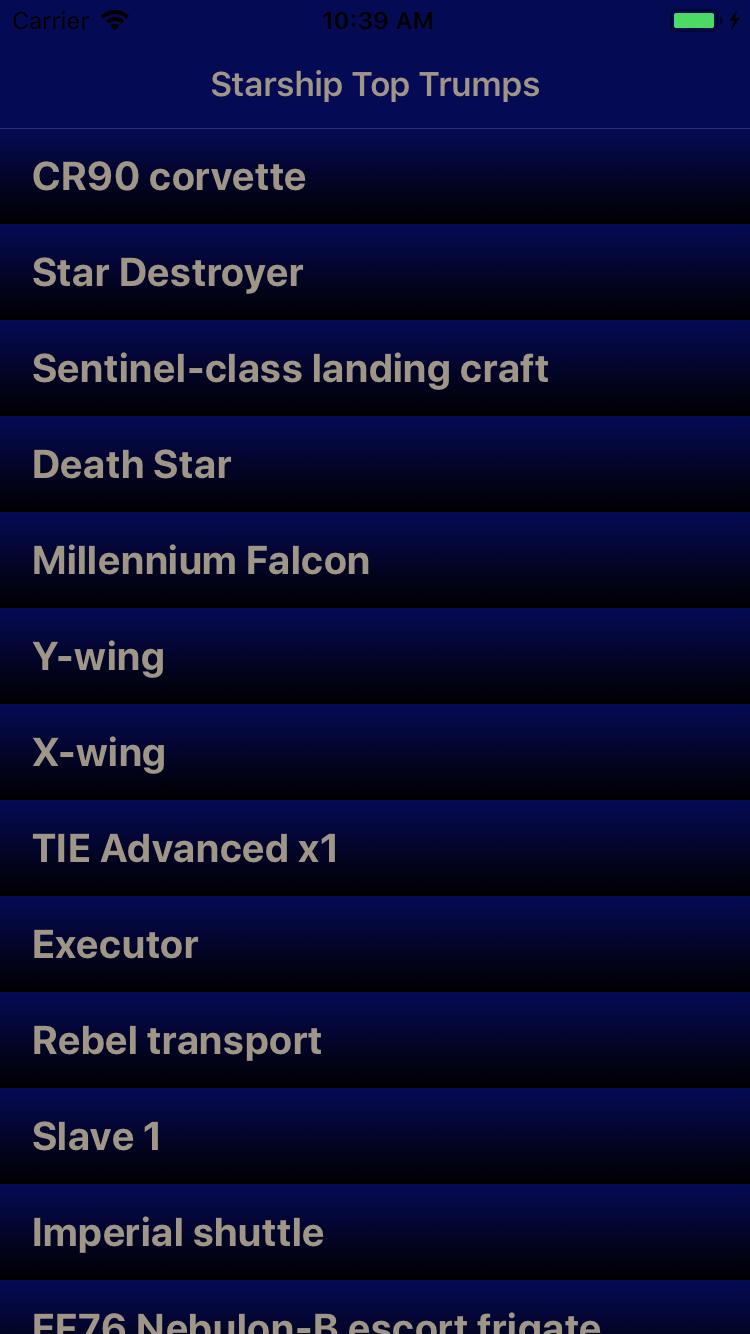
In this tutorial, y'all'll build a Star Wars Top Trumps carte app, which is comprised of a principal view that contains a list of Starships:

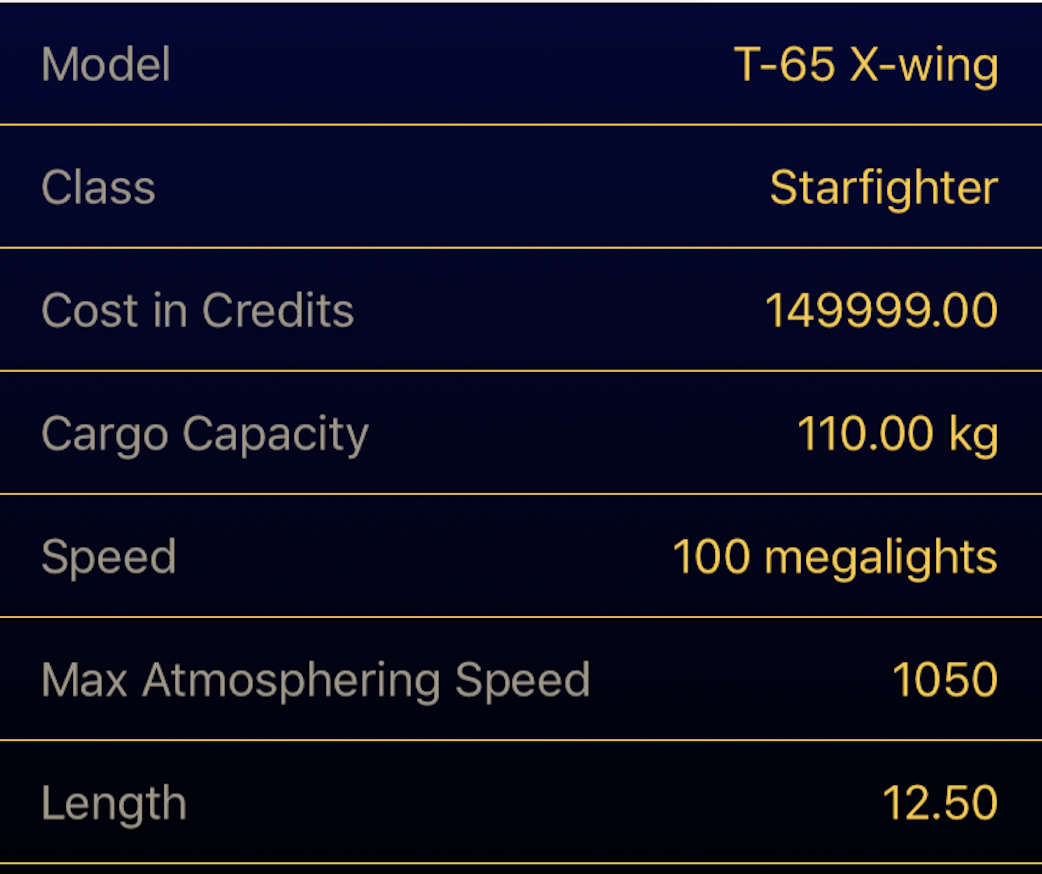
…besides every bit a item view for each Starship.

In creating this app, y'all'll acquire how to go started with Core Graphics, how to fill up and stroke rectangles and how to draw lines and gradients to make custom table view cells and backgrounds.
You lot might want to buckle up; it'southward time to have some fun with Core Graphics!
Getting Started
Use the Download Materials button at the top or lesser of this tutorial to download the starter and finished projects. Open the starter projection and have a quick look around. The app is based on the Master-Detail App template provided past Xcode. The principal view controller contains a list of Star Ships and the detail view controller shows details for each send.
Open up MasterViewController.swift. At the top of the class, discover a starships variable, which contains an array of type Starship and a dataProvider variable of type StarshipDataProvider.
Jump into StarshipDataProvider.swift past Command-clicking StarshipDataProvider and selecting Jump to Definition. This is a simple course that reads a arranged file, Starships.json, and converts the contents into an array of Starship.
You lot can find the definition for a Starship in Starship.swift. It is just a simple struct with backdrop for common properties of Starships.
Adjacent, open DetailViewController.swift. Defined at the acme of the file before the class definition is an enum, FieldsToDisplay, which defines the human readable titles for the Starship properties yous want to display as the cases in the enum. In this file, tableView(_:cellForRowAt:) is just a big switch argument for formatting the information for each Starship property into the right format.
Build and run the app.

The landing page is the MasterViewController showing a list of Starships from the Star Wars universe. Tap to select the X-fly and the app volition navigate to the detail view for that ship, which shows an epitome of an X-wing followed by various backdrop like how much it costs and how fast it can fly.

This is a fully functional, if pretty boring, app. Time to add some bling!
Analyzing the Table View Manner
In this tutorial, yous'll add together a different way to two different tabular array views. Take a closer look at what those changes look like.
In the chief view controller, each cell:
- Has a gradient from dark blueish to blackness.
- Is outlined in yellow, drawn inset from the jail cell bounds.

And in the detail view controller:
- The table itself has a gradient from dark blue to black.
- Each cell has a yellow splitter separating it from adjacent cells.
To draw both of these designs, you only need to know how to depict rectangles, gradients and lines with Core Graphics, which is exactly what you lot're well-nigh to learn. :]
Hello, Core Graphics!
While this tutorial covers using Core Graphics on iOS, information technology'southward important to know that Core Graphics is available for all major Apple platforms including MacOS via AppKit, iOS and tvOS via UIKit and on the Apple Watch via WatchKit.
You tin can think of using Core Graphics like painting on a physical canvas; the ordering of drawing operations matters. If you draw overlapping shapes, for instance, then the concluding i you add volition be on top and overlap the ones below.
Apple architected Core Graphics in such a way that you, as a programmer, provide instructions on the what to depict in a carve up moment than the where.
Cadre Graphics Context, represented past the CGContext class, defines the where. You tell the context what drawing operations to do. There are CGContexts for drawing to bit-mapped images, drawing to PDF files and, most commonly, drawing directly into a UIView.
In this painting analogy, the Core Graphics Context represents the canvas where the painter paints.
Core Graphics Contexts are State Machines. That is, when you lot set, say, a fill color you set it for the unabridged canvas and whatsoever shapes y'all draw will accept the aforementioned fill color until you alter information technology.
Each UIView has its own Cadre Graphics Context. To depict the contents of a UIView using Core Graphics, you lot draw(_:) of the view. This is considering iOS sets upward the right CGContext for drawing into a view immediately prior to calling describe(_:).
Now that y'all understand the basics of how yous use Core Graphics within UIKit, information technology'southward time for you to update your app!
Drawing Rectangles
To get started, create a new view file past selecting New ▸ File… from the File card. Select Cocoa Bear on Grade, press Next and so set the class proper noun to StarshipsListCellBackground. Get in a subclass of UIView, then create the class file. Add the post-obit code to your new class:
override func draw(_ rect: CGRect) { // ane baby-sit allow context = UIGraphicsGetCurrentContext() else { return } // 2 context.setFillColor(UIColor.scarlet.cgColor) // 3 context.fill(premises) } Breaking this down line by line:
- Kickoff, yous go the current
CGContextfor thisUIViewinstance usingUIGraphicsGetCurrentContext(). Remember, iOS set this up for you automatically prior to its callingdepict(_:). If you cannot get the context for whatsoever reason, you return early on from the method. - Then, you prepare the make full colour on the context itself.
- Finally, you tell it to fill the bounds of the view.
As yous tin can see, the Cadre Graphics API doesn't comprise a method for directly drawing a shape filled with a colour. Instead, a chip like calculation paint to a particular castor, you set a color every bit a state of the CGContext and so, you tell the context what to pigment with that color separately.
You might have also noticed that when you called setFillColor(_:) on the context you didn't provide a standard UIColor. Instead, you lot must use a CGColor, which is the fundamental data type used internally by Core Graphics to stand for colors. It'due south super easy to catechumen a UIColor to a CGColor by but accessing the cgColor property of any UIColor.
Showing Your New Jail cell
To run across your new view in activity, open up MasterViewController.swift. In tableView(_:cellForRowAt:), add together the following code immediately after dequeuing the jail cell in the commencement line of the method:
if !(jail cell.backgroundView is StarshipsListCellBackground) { cell.backgroundView = StarshipsListCellBackground() } if !(prison cell.selectedBackgroundView is StarshipsListCellBackground) { jail cell.selectedBackgroundView = StarshipsListCellBackground() } This code sets the cells' background view to be that of your new view. Build and run the app, and yous will see a lovely, if garish, red background in every cell.

Amazing! You tin can at present draw with Core Graphics. And believe it or non, you've already learned a bunch of really important techniques: how to get a context to depict in, how to change the fill colour and how to fill rectangles with a color. You can make some pretty nice UI with just that.
But you're going to take information technology a step further and learn most one of the well-nigh useful techniques to make excellent UIs: gradients!
Creating New Colors
You're going to use the same colors once again and again in this project, then create an extension for UIColor to make these readily accessible. Go to File ▸ New ▸ File… and create a new Swift File chosen UIColorExtensions.swift. Replace the contents of the file with the following:
import UIKit extension UIColor { public static let starwarsYellow = UIColor(carmine: 250/255, light-green: 202/255, blue: 56/255, alpha: ane.0) public static let starwarsSpaceBlue = UIColor(red: five/255, green: 10/255, blueish: 85/255, blastoff: one.0) public static let starwarsStarshipGrey = UIColor(red: 159/255, dark-green: 150/255, blue: 135/255, alpha: 1.0) } This code defines three new colors, which you can admission every bit static properties on UIColor.
Drawing Gradients
Side by side, since you're going to draw a lot of gradients in this project, add a helper method for cartoon gradients. This will simplify the project past keeping the gradient code in one identify and avoid having to repeat yourself.
Select File ▸ New ▸ File… and create a new Swift File called CGContextExtensions.swift. Supercede the contents of the file with the following:
import UIKit extension CGContext { func drawLinearGradient( in rect: CGRect, startingWith startColor: CGColor, finishingWith endColor: CGColor ) { // 1 allow colorSpace = CGColorSpaceCreateDeviceRGB() // ii permit locations = [0.0, 1.0] equally [CGFloat] // three let colors = [startColor, endColor] equally CFArray // 4 guard let gradient = CGGradient( colorsSpace: colorSpace, colors: colors, locations: locations ) else { render } } } There's a lot to this method:
- Commencement, you set upward the correct color space. There's a lot you can do with colour spaces, only you virtually always want to use a standard device-dependent RGB color infinite using
CGColorSpaceCreateDeviceRGB. - Next, you set upwards an array that tracks the location of each color within the range of the gradient. A value of 0 means the starting time of the slope and one means the end of the slope.
Notation: Y'all can have 3 or more colors in a slope if you want and you lot can fix where each color begins in the gradient in an array like this one. This is useful for certain effects.
- Later on that, yous create an assortment with the colors that you passed into your method. Observe the use of
CFArray, rather thanArray, hither as you are working with the lower level C APIs. - Then, you create your gradient by initializing a
CGGradientobject, passing in the colour space, array of colors and locations you previously made. If, for whatsoever reason, the optional initializer fails, you lot return early.
Y'all now have a gradient reference, just it hasn't actually drawn anything notwithstanding — it'due south only a arrow to the information you'll use when really drawing subsequently. Information technology'southward near time to draw the slope, simply earlier you do, it's time for a bit more than theory.
The Graphics State Stack
Recollect that Cadre Graphics Contexts are state machines. You have to exist careful when setting country on a context, especially within functions that you pass a context or, equally in this instance, methods on the context itself, as yous cannot know the state of the context before y'all alter it. Consider the following code in a UIView:
override func depict(_ rect: CGRect) { // ... become context context.setFillColor(UIColor.ruby-red.cgColor) drawBlueCircle(in: context) context.fill(someRect) } // ... many lines later func drawBlueCircle(in context: CGContext) { context.setFillColor(UIColor.bluish.cgColor) context.addEllipse(in: premises) context.drawPath(using: .fill) } Glancing at this code, you may think that information technology would depict a red rectangle and a blue circle in the view, but yous'd be incorrect! Instead, this lawmaking draws a blue rectangle and a blue circle — but why?
Because drawBlueCircle(in:) sets a bluish fill up color on the context and, because a context is a state machine, this overrides the red fill color gear up previously.
This is where saveGState(), and its partner method restoreGState()), come in!
Each CGContext maintains a stack of the graphics state containing most, although non all, aspects of the electric current drawing environs. saveGState() pushes a copy of the electric current state onto the graphics state stack, so y'all tin use restoreGState() to restore the context to that state at a subsequently date and remove the state from the stack in the process.
In the example above, y'all should modify drawBlueLines(in:) like this:
func drawBlueCircle(in context: CGContext) { context.saveGState() context.setFillColor(UIColor.blueish.cgColor) context.addEllipse(in: bounds) context.drawPath(using: .make full) context.restoreGState() } 
Y'all can test this out for yourself by opening RedBluePlayground.playground in the Download Materials push at the top or bottom of this tutorial.
Completing the Gradient
Armed with knowledge about the graphics state stack, it'southward time to consummate cartoon the groundwork slope. Add together the following to the end of drawLinearGradient(in:startingWith:finishingWith:):
// v let startPoint = CGPoint(10: rect.midX, y: rect.minY) let endPoint = CGPoint(x: rect.midX, y: rect.maxY) // 6 saveGState() // vii addRect(rect) clip() drawLinearGradient( gradient, start: startPoint, finish: endPoint, options: CGGradientDrawingOptions() ) restoreGState() - You lot commencement by calculating the start and terminate points for the gradient. You set this as a line from the top-eye to the bottom-eye of the rectangle. Helpfully,
CGRectcontains some instance variables likemidXandmaxYto make this really elementary. - Next, since you lot're about to modify the state of the context, you save its graphics state and end the method by restoring it.
- Finally, you draw the gradient in the provided rectangle.
drawLinearGradient(_:start:end:options:)is the method that actually draws the gradient but, unless told otherwise, it will fill the entire context, which is the unabridged view in your case, with the gradient. Here, you lot only desire to fill the slope in the supplied rectangle. To do this, you need to understand clipping.Clipping is an awesome characteristic in Core Graphics that lets y'all restrict drawing to an arbitrary shape. All you lot have to exercise is add the shape to the context but, and so, instead of filling it like you lot usually would, you lot call
prune()on the context, which then restricts all future cartoon to that region.So, in this case, you'll set the provided rectangle on the context and clip before finally calling
drawLinearGradient(_:starting time:stop:options:)to describe the slope.
Time to requite this method a whirl! Open up StarshipsListCellBackground.swift and, later getting the current UIGraphicsContext, replace the code with the following:
let backgroundRect = bounds context.drawLinearGradient( in: backgroundRect, startingWith: UIColor.starwarsSpaceBlue.cgColor, finishingWith: UIColor.black.cgColor ) Build and run the app.
You lot have now successfully added a gradient groundwork to your custom cell. Well done, immature Padawan! All the same, it would be fair to say the finished product isn't exactly looking corking merely now. Fourth dimension to fix that with some standard UIKit theming.
Fixing the Theme
Open Main.storyboard and select the table view in the Chief scene. In the Attributes inspector, set up Separator to None.

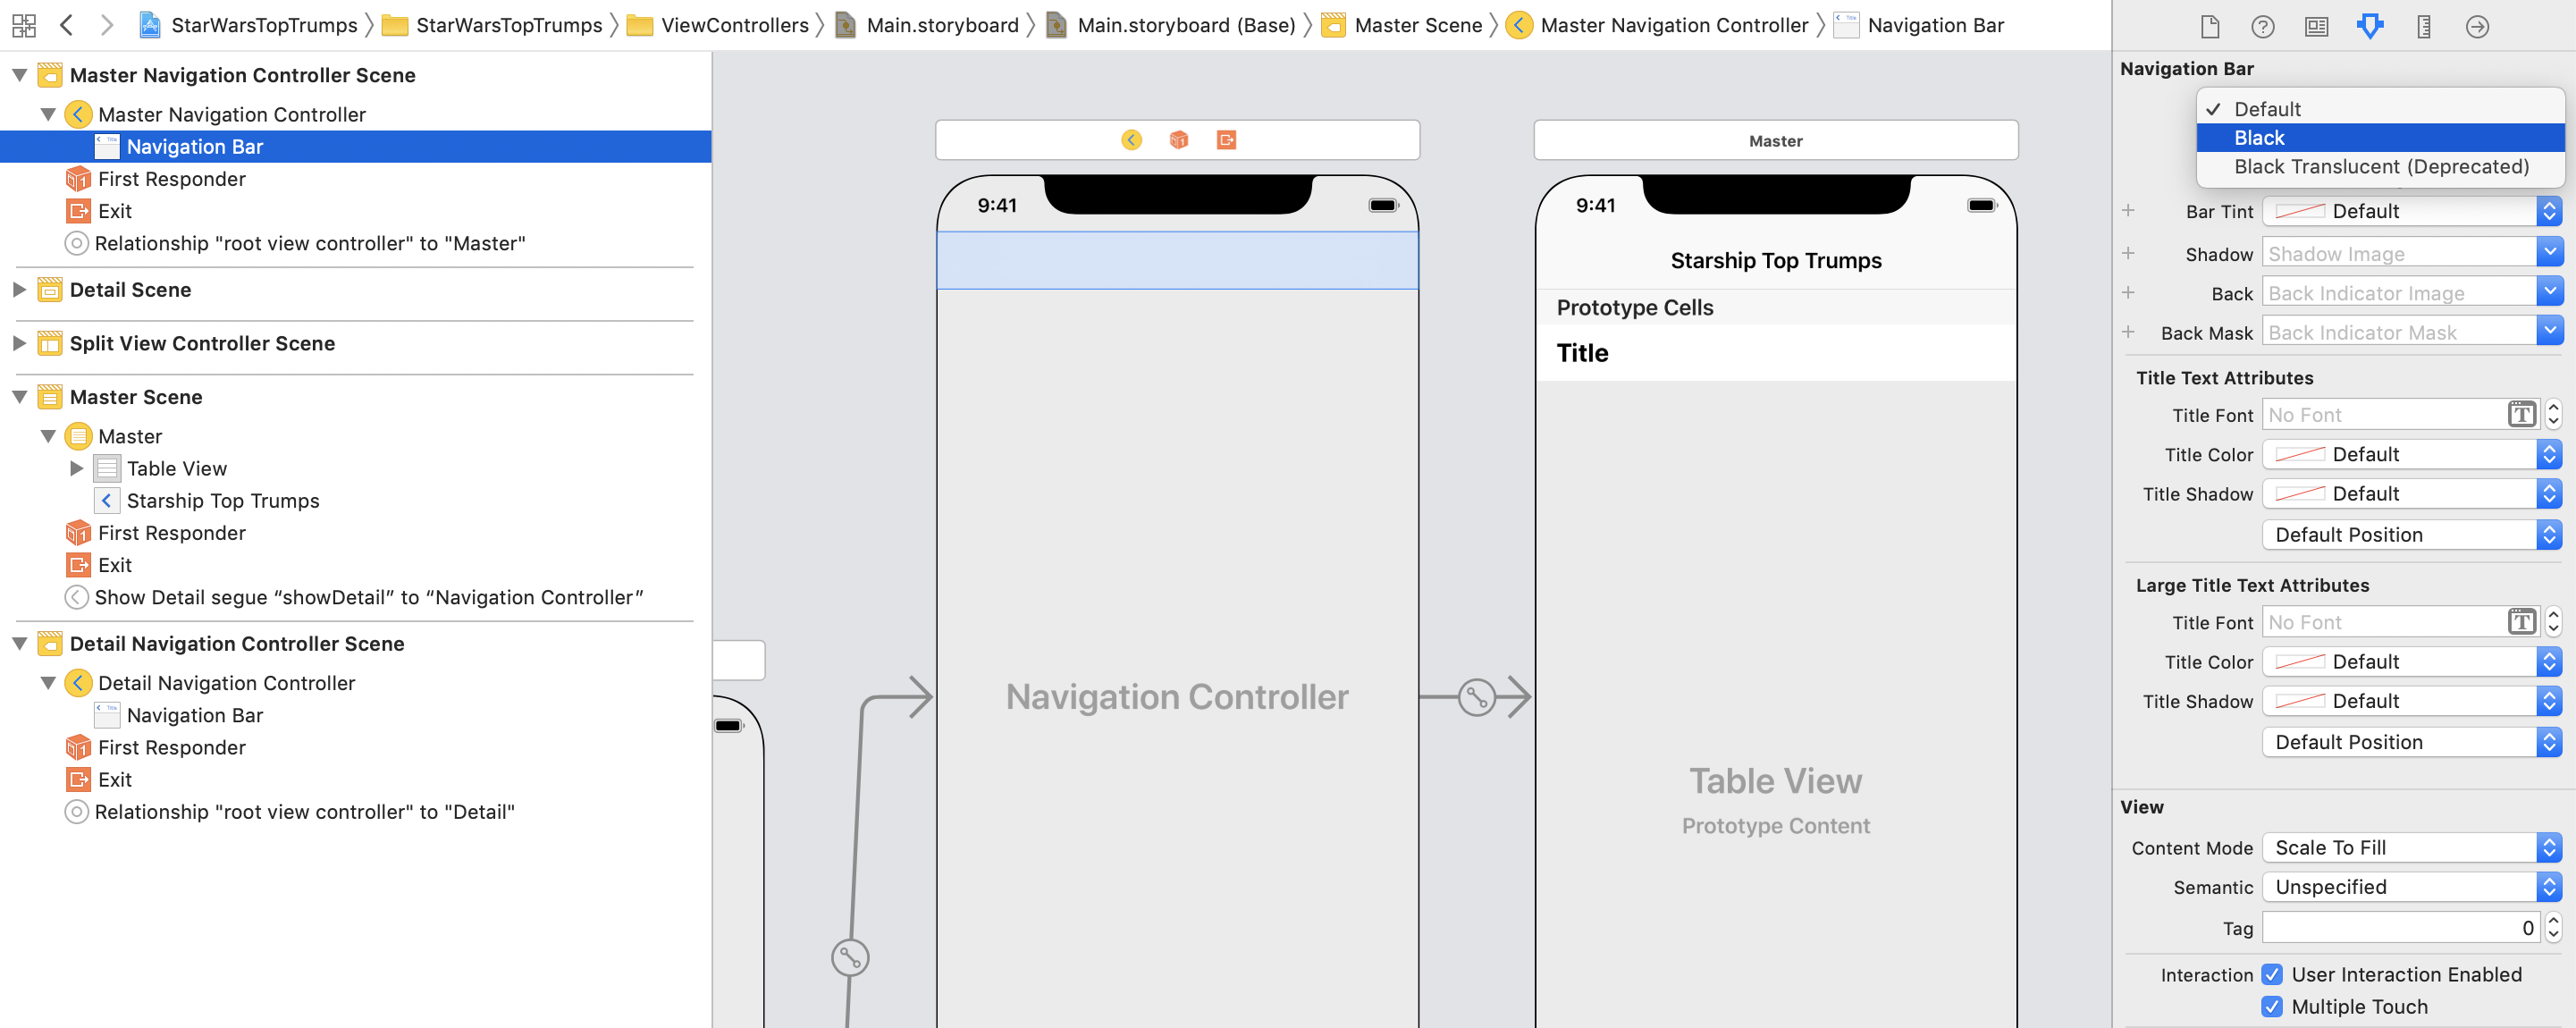
Then, select the Navigation Bar in the Main Navigation Controller scene and prepare the Navigation Bar Style to Black and deselect Translucent. Repeat for the Navigation Bar in the Detail Navigation Controller scene.
Side by side, open MasterViewController.swift. At the end of viewDidLoad(), add the following:
tableView.backgroundColor = .starwarsSpaceBlue So in tableView(_:cellForRowAt:), just before returning the cell, set the color of the text:
prison cell.textLabel!.textColor = .starwarsStarshipGrey Finally, open up AppDelegate.swift and in awarding(_:didFinishLaunchingWithOptions:) add together the following merely before returning:
// Theming UINavigationBar.appearance().tintColor = .starwarsYellow UINavigationBar.appearance().barTintColor = .starwarsSpaceBlue UINavigationBar.appearance().titleTextAttributes = [.foregroundColor: UIColor.starwarsStarshipGrey] Build and run the app.
That's amend! Your master tabular array view is starting to await very space age. :]
Stroking Paths
Stroking in Core Graphics means drawing a line along a path, rather than filling information technology, as yous did before.
When Core Graphics strokes a path, information technology draws the stroke line on the center of the exact edge of the path. This can cause a couple of common problems.
Outside the Bounds
Showtime, if you are drawing around the edge of a rectangle, a border, for example, Core Graphics won't draw half the stroke path by default.
Why? Considering the context set up up for a UIView simply extends to the premises of the view. Imagine stroking with a one point edge around the edge of a view. Because Core Graphics strokes downward the eye of the path, the line volition exist half a indicate outside the bounds of the view and half a betoken inside the premises of the view.
A common solution is to inset the path for the stroke rect half the width of the line in each direction then that information technology sits within the view.
The diagram below shows a yellow rectangle with a red stroke i point wide on a grey background, which is striped at one point intervals. In the left diagram, the stroke path follows the bounds of the view and has been cropped. You can run across this because the red line is half the width of the greyness squares. On the right diagram, the stroke path has been inset half a signal and at present has the correct line width.

Anti-Aliasing
2d, y'all need to be aware of anti-aliasing furnishings that can affect the advent of your border. Anti-aliasing, if y'all are unfamiliar with what it is (even if you may have heard about it on a computer game settings screen!), is a technique rendering engines utilise to avert "jagged" appearances of edges and lines when graphics existence displayed don't map perfectly to physical pixels on a device.
Take the example of a ane indicate border around a view from the previous paragraph. If the border follows the premises of the view, then Cadre Graphics will endeavor to draw a line half a signal wide on either side of the rectangle.
On a non-retina display one signal is equal to one pixel on the device. It is not possible to low-cal up but a one-half of a pixel, so Cadre Graphics will use anti-aliasing to draw in both pixels, merely in a lighter shade to give the appearance of only a unmarried pixel.
In the following sets of screenshots, the left image is a non-retina display, the middle image a retina display with a scale of 2 and the third image is a retina display with a scale of three.
For the first diagram, find how the 2x prototype doesn't evidence whatever anti-aliasing, equally the one-half point either side of the yellow rectangle falls on a pixel boundary. Still in the 1x and 3x images anti-aliasing occurs.

In this next set of screenshots, the stroke rect has been inset half a point, such that the stroke line aligns exactly with point, and thus pixel, boundaries. Notice how there are no aliasing artifacts.
![]()
Adding a Border
Back to your app! The cells are starting to look expert just you're going to add another touch to really make them stand out. This fourth dimension, yous're going to draw a vivid yellow frame around the edges of the cell.
You already know how to easily fill rectangles. Well, stroking around them is simply every bit like shooting fish in a barrel.
Open StarshipsListCellBackground.swift and add the post-obit to the bottom of draw(_:):
let strokeRect = backgroundRect.insetBy(dx: 4.5, dy: four.5) context.setStrokeColor(UIColor.starwarsYellow.cgColor) context.setLineWidth(1) context.stroke(strokeRect) Here, you create a rectangle for stroking that is inset from the background rectangle past 4.5 points in both the x and y directions. So you ready the stroke color to yellow, the line width to one point and, finally, stroke the rectangle. Build and run your project.
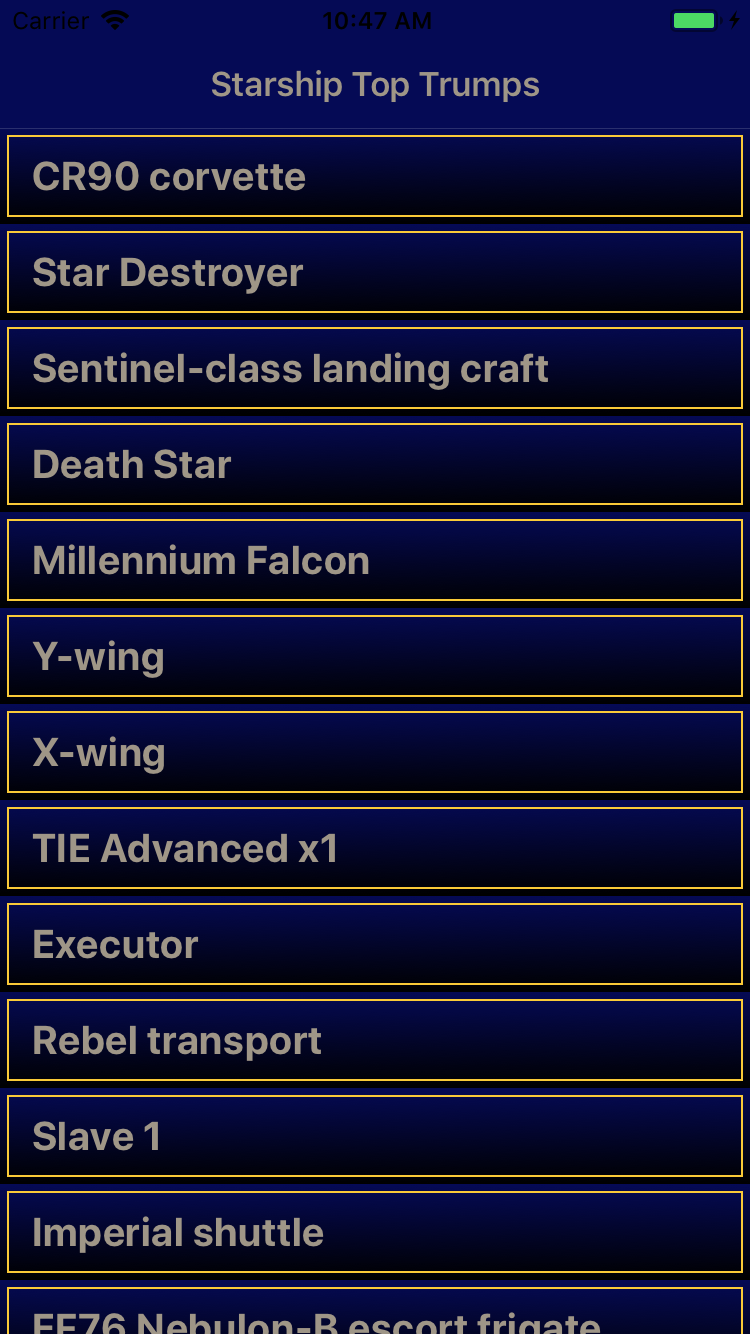
Now your starship list actually looks like it comes from a galaxy far, far away!
Edifice a Card Layout
While your master view controller is looking fancy, the detail view controller is still in need of some sprucing up!

For this view, y'all are going to beginning past drawing a gradient on the table view background by using a custom UITableView subclass.
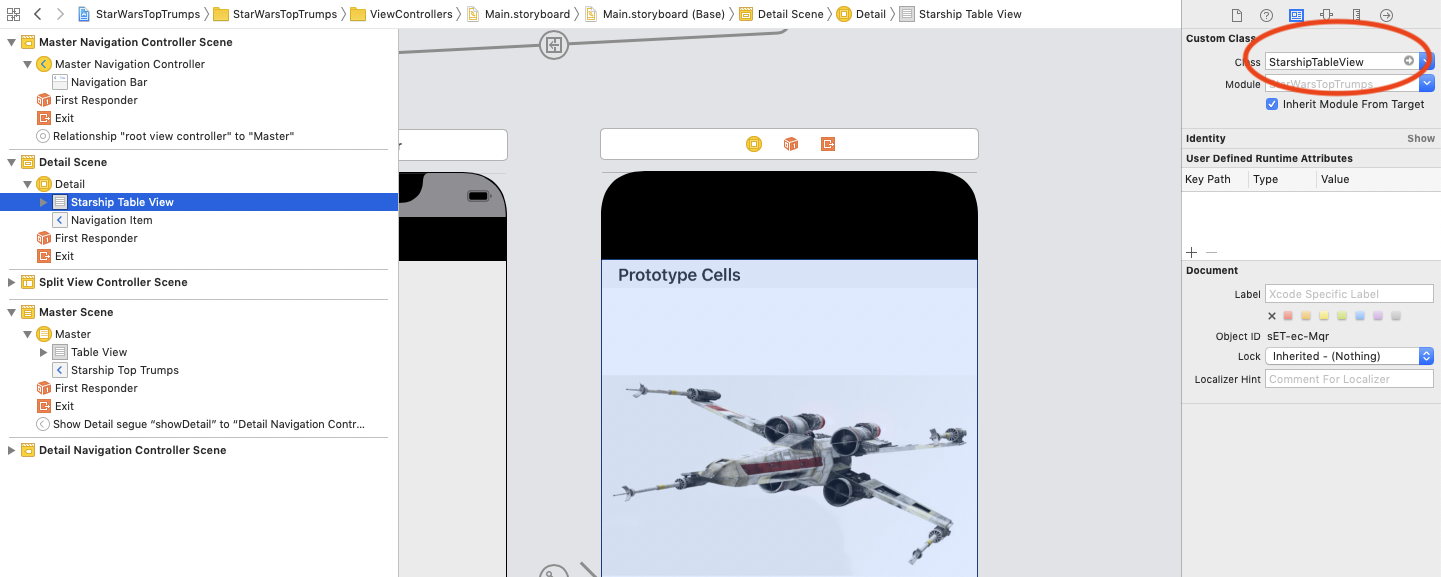
Create a new Swift File called StarshipTableView.swift. Replace the generated code with the following:
import UIKit class StarshipTableView: UITableView { override func draw(_ rect: CGRect) { guard let context = UIGraphicsGetCurrentContext() else { render } let backgroundRect = bounds context.drawLinearGradient( in: backgroundRect, startingWith: UIColor.starwarsSpaceBlue.cgColor, finishingWith: UIColor.blackness.cgColor ) } } This should be starting to look familiar by now. In the describe(_:) method of your new table view subclass yous go the current CGContext and so draw a gradient in the bounds of the view, starting from blue at the top and heading into black at the lesser. Simple!
Open Main.storyboard and click on the TableView in the Detail scene. In the Identity inspector, set the course to your new StarshipTableView.
Build and run the app, so tap the X-wing row.

Your particular view at present has a nice full screen gradient running from height to lesser, merely the cells in the tabular array view obscure the best parts of the effect. Time to set up this and add a flake more flair to the detail cells.
Back in Main.storyboard, select FieldCell in the Detail Scene. In the Attributes inspector, set the background to Articulate Colour. Next, open DetailViewController.swift and, at the very bottom of tableView(_:cellForRowAt:), just earlier returning the cell, add together the post-obit:
cell.textLabel!.textColor = .starwarsStarshipGrey cell.detailTextLabel!.textColor = .starwarsYellow This simply sets the cells' field name and value to more appropriate colors for your Stars Wars theme.
Then, later tableView(_:cellForRowAt:) add the post-obit method to style the table view header:
override func tableView( _ tableView: UITableView, willDisplayHeaderView view: UIView, forSection department: Int ) { view.tintColor = .starwarsYellow if permit header = view as? UITableViewHeaderFooterView { header.textLabel?.textColor = .starwarsSpaceBlue } } Here, y'all're setting the tint color of the table views' header's view to the theme xanthous, giving information technology a yellow background, and its text color to the theme blue.
Drawing Lines
As a final flake of bling, you'll add a splitter to each cell in the particular view. Create a new Swift file, this time called YellowSplitterTableViewCell.swift. Replace the generated code with the following:
import UIKit class YellowSplitterTableViewCell: UITableViewCell { override func draw(_ rect: CGRect) { guard let context = UIGraphicsGetCurrentContext() else { return } allow y = premises.maxY - 0.v let minX = bounds.minX permit maxX = bounds.maxX context.setStrokeColor(UIColor.starwarsYellow.cgColor) context.setLineWidth(1.0) context.motility(to: CGPoint(10: minX, y: y)) context.addLine(to: CGPoint(x: maxX, y: y)) context.strokePath() } } In YellowSplitterTableVIewCell, you lot are using Core Graphics to stroke a line at the bottom of the cells' premises. Notice how the y value used is half-a-point smaller than the premises of the view to ensure the splitter is drawn fully inside the cell.
Now, yous need to actually describe the line showing the splitter.
To draw a line between A and B, y'all first move to signal A, which won't cause Cadre Graphics to describe anything. Yous so add a line to indicate B which adds the line from point A to betoken B into the context. You lot can then call strokePath() to stroke the line.
Finally, open up Main.storyboard once more and set the class of the FieldCell in the Detail scene to be your newly created YellowSplitterTableViewCell using the Identity inspector. Build and run your app. Then, open the Ten-wing detail view. Cute!
Where to Go From Here?
You tin download the final projection using theDownload Materials link at the top or bottom of this tutorial.
The download also includes two playgrounds. RedBluePlayground.playground contains the example set out in the context saving/restoring section and ClippedBorderedView.playground demonstrates clipping a edge unless it'due south inset.
Additionally, DemoProject is a full Xcode projection which strokes a rect over a i point grid. This project is written in Objective-C and so you can run it without modification on non-retina devices like the iPad 2, which require iOS 9, to see the anti-aliasing effects for yourself. Only don't panic! It's piece of cake to empathize now you know the Core Graphics Swift API. :]
At this point, you lot should exist familiar with some pretty cool and powerful techniques with Core Graphics: filling and stroking rectangles, drawing lines and gradients and clipping to paths. Not to mention your table view at present looks pretty cool. Congratulations!
If this tutorial was a little hard to follow, or you want to brand sure to encompass your basics, check out the Commencement Core Graphics video series.
If you're looking for something more than avant-garde, take a look at the Intermediate Core Graphics course.
And if you don't feel like y'all tin can commit to a full course still, endeavor the Core Graphics Article Series where you'll learn how to draw an entire app, including graphs, from scratch with Cadre Graphics!
Plus there are many more Cadre Graphics tutorials, all recently updated for Xcode x, on the site.
If you have whatever questions or comments, please join the forum discussion below.

Source: https://www.raywenderlich.com/475829-core-graphics-tutorial-lines-rectangles-and-gradients
Posted by: edwardswiging.blogspot.com
0 Response to "How To Draw A Simple Ship"
Post a Comment